
Ding repair.
+4
kubo king deluxe
boss
woosa!
Strange 1
8 posters
ALON :: The Community :: Tech Support
Page 1 of 1
![]()
 Ding repair.
![]() Strange 1 Mon Aug 11, 2008 3:06 pm
Strange 1 Mon Aug 11, 2008 3:06 pm
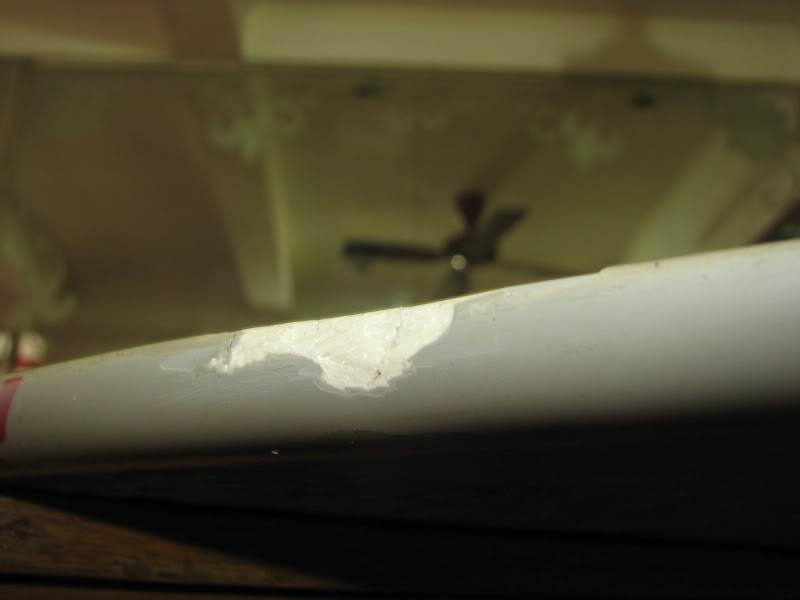
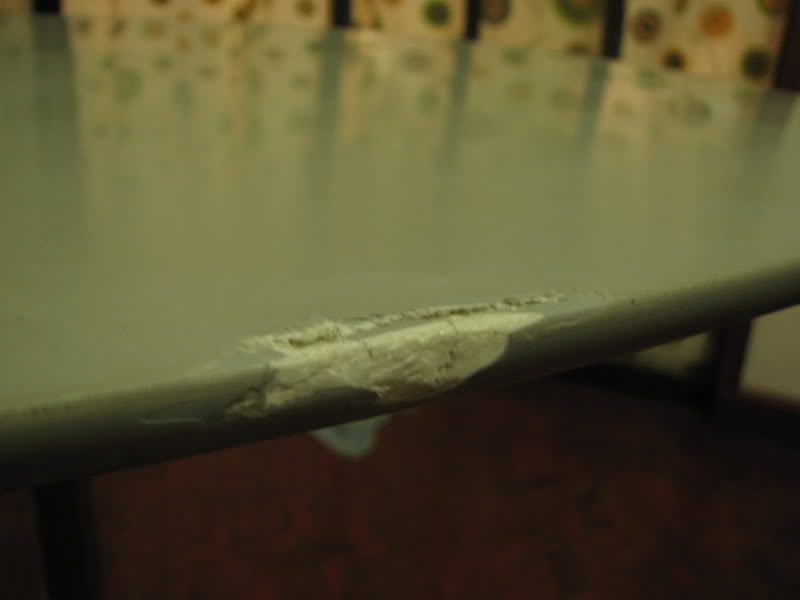
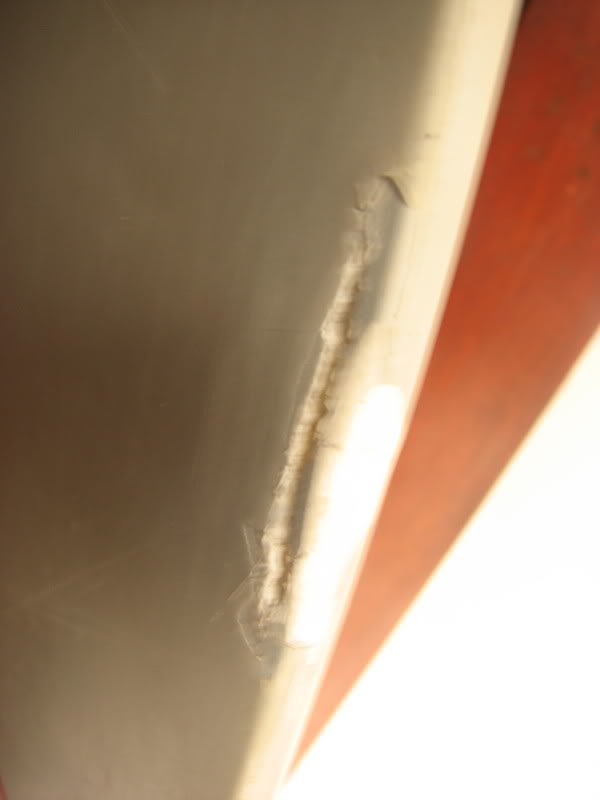
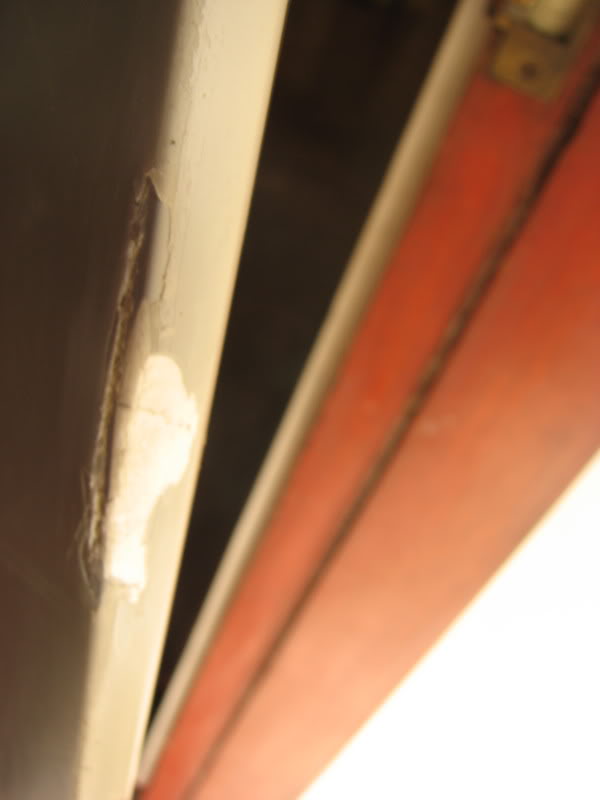
This is an example of a basic ding repair. The techniques used here can be applied to other kinds of dings as well however some modifications may be necessary. This technique will not allow you to repair serious damage where part of the board has been destroyed.
Step #1: Analyze the situation. How bad is the ding? Has the ding weakened the board structurally? This guide is intended to tell you how to fix minor dings only. If the ding is mostly cosmetic, this guide can help you fix it.
Step #2: Make sure you have everything you are going to need before you start. A good way to do this is to read this entire guide carefully before hand and to think out every step ahead of time.
Step #3: Grind out the ding so that the damaged area is completely removed. Generally you do not want to destroy the bottom of the board at all. Instead use a Dremel Tool to carve out damaged foam and fiberglass in the ding area. Don't get carried away. Just carve out the damaged areas. There should be a nice clean hole when you are done.
Step #4: Sand the affected area. Sand the entire area including the immediately surrounding area. You want to sand all surfaces that will be bonded to.
Step #5: Clean the affected area by blowing off all dust and then wiping it down with acetone or rubbing alcohol.
Step #6: Cut your fiberglass. Always make your cuts at a 45 degree angle to the weave. This will help the cloth keep from falling apart in your hands later on. Make sure the size of your patches are large enough to cover the entire affected area and some of the surrounding area. When in doubt, cut them too large rather than too small. You want to cut four pieces of cloth if you are using lightweight (4oz or 6oz) cloth. If you are using carbon fiber cut one patch of carbon and three of fiberglass.
Step #7: Mix your resin and catalyst together using the ratio required for your specific resin. Stir thoroughly. You won't need very much resin. 1/3 cup will almost always be enough.
Step #8: Add your filler(s) to the resin. There is no exact rule but generally you want to use one lightweight filler and one structural filler in your mix. One common combination is to use cabosil and milled fiber at a ratio of 3:1 (more cabosil). Add in a small amount of each and stir it all in, then add more if necessary. The goal is to get it to the consistency of peanut butter.
Step #9: Take the thickened resin and get a good blob of it on the end of your tongue depressor. Smear the resin into the void you grinded out earlier. If it is a particularly bad ding such as the one pictured above you may have to rebuild the nose a little bit with the thickened resin. This can be a very hard thing to do. Make sure your resin is thick enough and have some patience. It may take some time to get it just right.
Step #10: Depending on how damaged the nose is you may want to stop at this point and let the filler cure. This allows you to reshape the nose before applying the fiberglass. If the damage is minor however, you can do it all in one step. Go back and get your fiberglass. Mix another cup of resin (partial cup). Brush some resin onto the affected area to help the fiberglass stick. Lay the edge of the cloth on the top of the board and work downwards making sure that the glass makes contact with the board in all places. For minor dings you do not have to wrap the cloth around on to the bottom of the board. You can just leave it hanging downward and then trim the bottom with scissors (while wet) or grind/sand it off (if cured). If you are using carbon fiber, make sure that it is on the bottom (touching the board), otherwise you will just sand it off. This is often the hardest step. Have patience and you will get it right.
Step #11: Let the resin cure. This can take anywhere from a couple of hours to 2 days depending on the temperature and the kind of resin you are using. Heat makes most resins cure quicker so you may want to put it in the sun. Wait till it is fully cured to sand it. It will make your life easier.
Step #12: If you have a grinder or grinder attachment use it to carefully sand down the repaired area so that it is almost flush with the board. Do not sand too far because you will go right through the board and into the foam! If you do not have a grinder you are going to have to do a fair amount of hand sanding. Get out your rough grit paper and start moving.
Step #13: Sand "the rest" of the way by hand using rough then medium and finally fine grits. When you are done the surface should be "baby soft".
Step #14: If you did a carbon repair you can make it look prettier by waxing the board so that it all looks the same. An even easier way is to smear surf wax on the ding repair and let it melt in the sun. After it has fully melted you can wipe it off with a paper towel. This usually makes it look much better.
Credits: www.skimonline.com
Last edited by Strange 1 on Mon Aug 11, 2008 3:32 pm; edited 2 times in total

Strange 1- Admin

- Posts : 696
Join date : 2008-05-26 -

![]()
![]()

woosa!- Hardcore Skimboarder
- Posts : 1111
Join date : 2008-06-15
Age : 41
Location : qc, mindoro -
![]()
![]()
Re: Ding repair.
![]() boss Tue Oct 28, 2008 4:00 am
boss Tue Oct 28, 2008 4:00 am
san po nakakabili ng resin and fibercloth sa manila? d ko po alam ano pang aayos ko sa board ko e, help man! thanks...

boss- Member

- Posts : 35
Join date : 2008-10-23
Age : 42
Location : Cavite
![]()
![]()
Re: Ding repair.
![]() kubo king deluxe Thu Oct 30, 2008 8:18 pm
kubo king deluxe Thu Oct 30, 2008 8:18 pm
polymer products they sell resin and fiber matting sa pasay or alabang meron dame din sila branches..

kubo king deluxe- Member
- Posts : 24
Join date : 2008-10-23
![]()
![]()
Re: Ding repair.
![]() sk8punk Fri Oct 31, 2008 6:53 am
sk8punk Fri Oct 31, 2008 6:53 am
Polymer caloocan branch near shell gas station ....

sk8punk- Moderator
- Posts : 1465
Join date : 2008-05-29
Age : 39
Location : island city of malabon -
![]()
![]()
Re: Ding repair.
![]() life2enjoi Tue Apr 28, 2009 5:57 pm
life2enjoi Tue Apr 28, 2009 5:57 pm
mga kapatid yan na and ding ng board ko =)
teejjjjjjjjjjjjj,jaro,ger tulonggggggggggggg


teejjjjjjjjjjjjj,jaro,ger tulonggggggggggggg

life2enjoi- Hardcore Skimboarder
- Posts : 524
Join date : 2008-07-26
Age : 43
Location : makati & las pinas -
![]()
![]()
life2enjoi- Hardcore Skimboarder
- Posts : 524
Join date : 2008-07-26
Age : 43
Location : makati & las pinas -
![]()
![]()
Re: Ding repair.
![]() jaro man Tue Apr 28, 2009 7:27 pm
jaro man Tue Apr 28, 2009 7:27 pm
awtch! ang lalaki pla.. tinuklap mo ba? kaya yan brie. gagayahin lang natin cguro yung video pinapanood mo sa akin kahapon. pero iba yung situation ng board mo, kung baga wasak talaga. pero matatapalan yan ng cloth at resin. lilihain lang para bamalik sa dating shape. katulad din ng cnabi mo, pwede din nating isander.

jaro man- Skimboarder

- Posts : 470
Join date : 2008-07-27
Age : 39
Location : zambales
![]()
![]()
Re: Ding repair.
![]() life2enjoi Tue Apr 28, 2009 8:05 pm
life2enjoi Tue Apr 28, 2009 8:05 pm
palamanan daw yata ng pata eh..nde ko pa alam medyo busy pa ako sa work.. search about railing ding reapair
Last edited by life2enjoi on Tue Apr 28, 2009 10:52 pm; edited 1 time in total
life2enjoi- Hardcore Skimboarder
- Posts : 524
Join date : 2008-07-26
Age : 43
Location : makati & las pinas -
![]()
![]()
Re: Ding repair.
![]() life2enjoi Tue Apr 28, 2009 8:34 pm
life2enjoi Tue Apr 28, 2009 8:34 pm
nalinis ko na nde ko pa alam kung linisin ko pa ng sagad... check mo post ni ger how to repair victoria
life2enjoi- Hardcore Skimboarder
- Posts : 524
Join date : 2008-07-26
Age : 43
Location : makati & las pinas -
![]()
![]()
Re: Ding repair.
![]() sk8punk Tue Apr 28, 2009 9:27 pm
sk8punk Tue Apr 28, 2009 9:27 pm
dalin mo dito sa bahay yan brien tapos agad yan....gawen ko pre inuman lang katapat nyan...teji tara sama ka...
sk8punk- Moderator
- Posts : 1465
Join date : 2008-05-29
Age : 39
Location : island city of malabon -
![]()
![]()
Re: Ding repair.
![]() jaro man Tue Apr 28, 2009 9:33 pm
jaro man Tue Apr 28, 2009 9:33 pm
ayun! sabi ko sayo madali lang yan eh brie eh.. si gerwin kaya nya rin yan..
jaro man- Skimboarder
- Posts : 470
Join date : 2008-07-27
Age : 39
Location : zambales
![]()
![]()
Re: Ding repair.
![]() sk8punk Sun May 03, 2009 8:31 pm
sk8punk Sun May 03, 2009 8:31 pm
brien na sandpaper mo na ba yun na repair naten? post some pix para my b4 n after tyo
sk8punk- Moderator
- Posts : 1465
Join date : 2008-05-29
Age : 39
Location : island city of malabon -
![]()
![]()
jaro man- Skimboarder
- Posts : 470
Join date : 2008-07-27
Age : 39
Location : zambales
![]()
![]()
foam filler
![]() redline Thu May 21, 2009 7:33 pm
redline Thu May 21, 2009 7:33 pm
foam & gap filler 300-600php depende sa brand.
nabibili ito sa ace hardware in spray can nde sya natutunaw ng resin khit direct application madali din i sand super sticky pag spray mo sa kanya aalsa sya 3x nung amount na lumabas sa tube 100% proven and tested sa mga long board and thrusters
nabibili ito sa ace hardware in spray can nde sya natutunaw ng resin khit direct application madali din i sand super sticky pag spray mo sa kanya aalsa sya 3x nung amount na lumabas sa tube 100% proven and tested sa mga long board and thrusters

redline- Member
- Posts : 15
Join date : 2009-01-26
![]()
![]()
Re: Ding repair.
![]() sk8punk Thu May 21, 2009 9:06 pm
sk8punk Thu May 21, 2009 9:06 pm
redline wrote:foam & gap filler 300-600php depende sa brand.
nabibili ito sa ace hardware in spray can nde sya natutunaw ng resin khit direct application madali din i sand super sticky pag spray mo sa kanya aalsa sya 3x nung amount na lumabas sa tube 100% proven and tested sa mga long board and thrusters
thanks for this info bro...
sk8punk- Moderator
- Posts : 1465
Join date : 2008-05-29
Age : 39
Location : island city of malabon -
![]()
![]()
![]()


ALON :: The Community :: Tech Support
Page 1 of 1
Permissions in this forum:
You cannot reply to topics in this forum